Marketers choose Braze so they can connect with their customers on a personal level, across multiple channels, using data and automation. You can choose from emails, push notifications, in-app messages, SMS, and more. You will have tools for creating personalized messages, segmenting audiences, and automating campaigns based on user actions. For example, a welcome series that starts with an email and follows up with a push notification and in-app message. Braze also offers A/B testing and analytics to help businesses optimize their messaging and improve customer engagement.
If you’re new to Braze, launching your first campaign might feel overwhelming, but with the right steps, you’ll be up and running in noatime.
Think of approaching your Braze campaign like a recipe, you can ensure that you have all the necessary elements in place for a successful outcome. So, let’s gather our ingredients, set the timer, and embark on this culinary journey of crafting an irresistible Braze campaign!
Braze Campaigns are used when you want to engage with your users with a single message. You can send them a campaign using any supported messaging channel. Most multi-step user journeys are better created as Canvases. Learn more about Braze Canvases by clicking here.
Let’s walk through the steps to your irresistible Braze campaign!
Braze Integrated Data Sources
First, make sure you have your Braze Account integrated with your data sources. Whether you’re pulling customer data from a CRM, transactional database, or other tools, Braze allows you to sync all your key data to ensure the right messages are sent to the right users. You can set up data imports via APIs or use Braze’s pre-built integrations with platforms like Salesforce, Shopify, and more.
Another tool in Braze toolbox is the Braze SDK. The Braze SDK is a tool that collects and synchronizes user data to create a unified user profile, and enables messaging channels like push notifications, in-app messages, and Content Cards. It is required to send in-app or push notifications, and it allows segmentation and personalization based on action events like abandon carts and abandon browse.
Let’s get all the details: What, When, Who, Why, Where, How
- What – Name your Campaign
- Use a name that will help you in the future understand what you were trying to help the user do or understand
- When – What will your Campaign Start conditions be?
- Users can enter your campaign in three ways
- A set date and time (scheduled)
- When they perform a specific action (action-based)
- When they do something that triggers an API call (API-triggered)
- Users can enter your campaign in three ways
- Who – Define your Entry Audience
- Who are you trying to reach?
- You can use pre-defined segments to target users based on their demographic, behavioral, or technical characteristics and actions. Add more filters when building your campaign to tailor your segment further.
- Why – Identify Conversion Events
- Why are you building this Campaign?
- Selecting at least one conversion event will give you the ability to understand your campaign performance.
- Where – Where can you best reach your audience?
- This is where we determine which messaging channels make the most sense for your user journey.
For more details about the 5 W’s and how they can help you visualize your customer engagement strategies and goals, you can visit the Braze User Guide page.
Now let’s get to How to build your campaign after identifying the five W’s
You will need to log in to Braze and navigate to the workspace where you want to create the campaign. Once you are logged in and in the correct workspace, you can access the “Create Campaign” process in 2 ways.
- In the top left corner of your Dashboard, in the “QUICK LINKS”
- In the main Navigation on the left, click on Messaging then select “Campaigns”
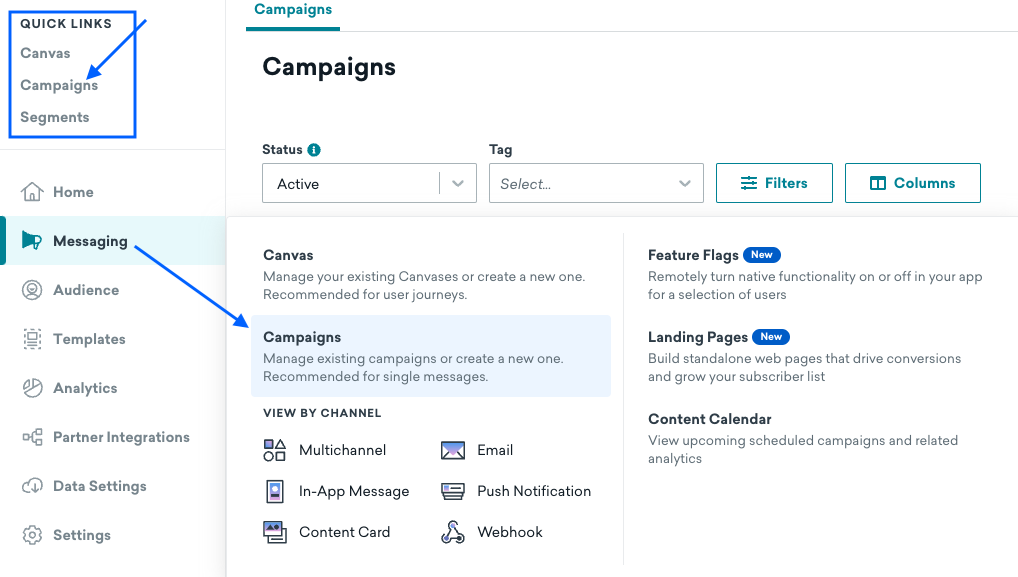
- After navigating to the Campaigns dashboard, click on the “Create campaign” button in the top right corner.
After you click on “Create Campaign” and select Multi-Channel or the specific channel you want to use you will see the Main Campaign setup screen with Steps 1 through 5.
![]()
Step 1: Compose Messages
In this section, you will define your message, including any variants.
Keep in mind that personalization is key to driving engagement. Braze allows you to use user attributes (like name, location, or past interactions) to tailor each message. You can also use A/B testing to determine which version of your message resonates best with your audience.
Braze allows you to insert dynamic content into your messages, so you can personalize your communication based on real-time data. For example, a push notification could display a personalized discount based on a user’s previous purchase behavior.
- Name your Campaign
- Add description (optional, but recommended)
- Add Tags – Tags can be useful in Segmentation, Filtering, and reporting
I am using the Email Channel in my campaign.
- Email Variants – you can choose to use multiple versions of the same marking message.
- An A/B test is an experiment that compares users’ responses to multiple versions of the same marketing message. These versions share similar marketing goals but differ in wording and style.
- If you are using multiple variants, you can add them in this area.
- Tip: If all of the messages in your campaign are going to be similar or have the same content, compose your first message before adding additional variants. You can then choose Copy from Variant from the Add Variant dropdown.
- Your A/B Testing options will be available in “Step 3 – Target Audiences.”
- Compose your message(s) using the options available for your selected channel.
- The Email channel offers email templates or you can upload a template from a file (HTML editor only), or use a blank template.
- Tip: We recommend selecting one editing experience per email campaign. For example, choose either the HTML Classic or Block editor in a single email campaign rather than switching between editors.
- After you have finished designing and building your message, you can add your sending information for the Email Channel.
- Click on the “Edit Sending Info” link in the top section of your campaign.
- From Display Name + Address
- Reply-To Address
- BCC Address
- Subject
- Preheader
- Click on the “Edit Sending Info” link in the top section of your campaign.
-
Preview and test your message
Now we will set your Delivery Schedule
Every marketer understands the importance of timing, and Braze provides multiple scheduling options to help you reach users at the right moment. However, with various choices available, it can be challenging to determine which schedule type aligns best with your campaign goals.
Messages can be delivered based on a scheduled time, an action, or based on an API trigger. For more, refer to Scheduling your campaign.
Step 2: Schedule Delivery
In this section, you will choose a delivery schedule or trigger.
- Scheduled
- Action-Based
- Set Campaign Duration
- Quiet Hours
- API-Triggered
- Depending on which Delivery Type you choose, you will have different options.
- Time-Based Scheduling Options
- Select your timing option
- Send as soon as Campaign is launched
- Send at a Designated time
- Intelligent Timing
- Each user will receive the Campaign at the time they are most likely to engage
- Select your timing option
- Select Send Frequency
- Once
- Daily
- Weekly
- Monthly
- Send Campaign to users in their local time zone
- Check this box if you would like messages sent in the users local timezone
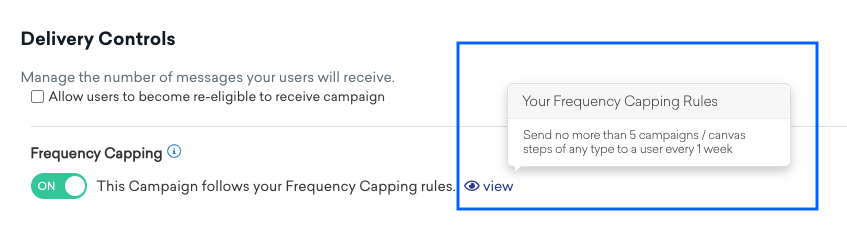
- Delivery Controls
- If you would like your users to be able to become re-eligible to receive this campaign, you can check the box
- You will also need to select how long the system should wait before allowing the user to become re-eligible
- Frequency Capping
- The Frequency Capping rules will apply by default unless you toggle the switch to OFF
- Set Frequency Cap rules to control the volume of messages that your users will receive and avoid overwhelming your audience.
- Click on the “view” button to see your default settings
- The Frequency Capping rules will apply by default unless you toggle the switch to OFF
Creating Your Target Audiences
Once you have created your message and scheduled your delivery, you need to choose the users you want to target. You can do this by creating a segment or using an existing one.
Step 3: Target Audiences
In this section, you will select a User Segment and further refine your audience by adding additional filters.
- Target Users By Segment
- Select one or more Segments from the dropdown
- To further refine your audience, add filters to Filter groups
Click here for more detailed information on Create Segments and Filter groups.
Step 4: Assign Conversions
In this section, you will select your Conversion metrics
Assigning Conversions to your Campaign allows you to track and attribute conversions to specific marketing campaigns, channels, and touchpoints. Click here for more detailed information.
You can define up to 4 conversion events for each Campaign. The primary conversion event is the first event added during the campaign creation and has a significant impact on engagement and reporting. It is used for the following purposes:
- Computing the winning message variation in multivariate campaigns.
- Determining the window when revenue is calculated for the campaign.
- Adjusting message distributions for campaigns using Intelligent Selection.
To get started:
- Select the conversion event type you want to assign.
- Depending on which event type you choose, you may or may not see the next dropdown to select the apps and websites.
- Select the Apps and websites targeted
- Select the Conversion deadline
- This will be the maximum time that may pass between a user entering your Campaign and the conversion
Click on the “Add Conversion Event” to add additional Conversion events.
Step 5: Review Summary
The Campaign Review Summary tab provides a comprehensive overview of your campaign settings.
The tab includes the following key configuration areas:
- Reach: The number of users who are currently reachable to receive your campaign message.
- Messages: View details of each of your messages
- Delivery: View your entry schedule, re-entry, and frequency cap settings along with any A/B Test settings
- Audience: View details of your Target Audience segments and any additional filter groups
- Conversions: View Conversion Event details
Launch Campaign
Once you have reviewed your campaign settings, you can launch your campaign.
- Click on the “Launch Campaign” button in the bottom right corner of your screen
- A confirmation message will appear. Click on the “Confirm” button to launch your campaign.
Your campaign will now be live and will start sending messages to your target audience.
Continuous Optimization
Once your campaign is live, Braze’s analytics will provide valuable insights into what’s working and what isn’t. If you find that a particular segment responds better to one version of a message, iterate and refine future campaigns based on this data.
Marketing is never a ‘set it and forget it’ process. Continually monitor your campaigns, try new messaging strategies, and refine your approach to improve performance over time.
Both Campaign Analytics and Report Builder are powerful tools that can help you measure the success of your campaigns and optimize your marketing efforts.
Campaign Analytics
Campaign Analytics offers real-time data on key metrics such as open rates, click-through rates, and conversions. This information can help you understand how your campaigns are performing and identify areas for improvement. Click here for information on the available analytics for each channel.
- Once you’ve launched your campaign, you can return to the details page for that campaign to view key metrics. Navigate to the Campaigns page and select your campaign to open the details page.
- Review the panel to see overall metrics such as the number of messages sent to the number of recipients, the primary conversion rate, and the total revenue generated by this message. You can also review delivery, audience, and conversion settings from this page.
Report Builder
Report Builder allows you to create custom reports that provide deeper insights into your campaign data. You can use Report Builder to track campaign performance over time, compare different campaigns, and analyze user behavior.
While your first campaign may be simple, there’s so much more you can do with Braze. From advanced segmentation to cross-channel messaging and automated workflows, Braze has the tools you need to scale your customer engagement efforts. Don’t be afraid to experiment and learn from your results.
Whether you’re new to Braze campaigns or a seasoned pro, we encourage you to experiment and have fun. Let us know how we can assist you with Braze Campaigns or anything else to support your growth as a marketer.