A few blogs back in our Tool Tips series, I reviewed the basics of Oracle Eloqua Custom Objects. Today, I’ll be diving deeper into how you can leverage the Custom Object Upload Wizard to add additional data to your CDO.
First, the What:
There are a few ways to create or update custom data records within a Custom Data Object (CDO):
- Form processing steps
- API Integration
- Upload using the “Custom Object Record Upload Wizard”
This Tool Tip will provide a detailed overview of the third option: Using the “Custom Object Record Upload Wizard”.
Rather than creating CDO records from Oracle Eloqua form processing steps or via integration, this useful tool will allow you to upload records or modify existing records into a Custom Data Object in six simple steps.

Then, the Why:
The “Custom Object Record Upload Wizard” will create records within a specified CDO. Here are a few examples of how the upload wizard can be used:
- Add new records to a CDO
- Overwrite existing data records in a CDO
- Append data to existing records in a CDO
- Trigger CDO services based on new or modified records
Finally, the How:
First let’s review some terminology covered in part 1 of this blog series:
- Custom Data Object (CDO) or Custom Object: Object (or database) that is made up of custom data records
- Custom Data Record (CDR): Individual record within a CDO that holds data; a CDR may or may not be linked to a Contact or Account
- Custom Data Record Field: Customized fields used to store data
Tip: Think of the CDO as a worksheet, the CDR as each row in the worksheet, and the CDR Fields as the column headers.
- Companies: Within the Custom Data Object interface in Oracle Eloqua, “Accounts” will be referred to as “Companies”
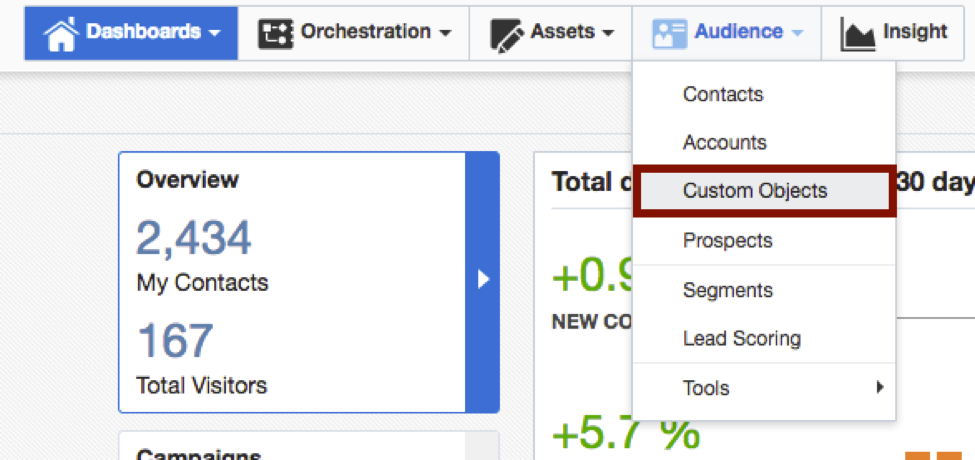
To access the Custom Object Record Upload Wizard, select Audience > Custom Objects from the main tool bar.
Assuming you have already created a Custom Data Object, select your Custom Data Object from the list on the left to open. If you still need to create a CDO, read part one of this Tool Tip series.
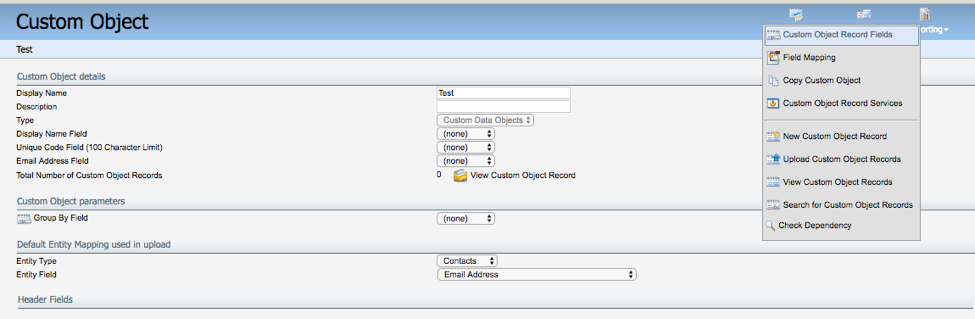
Click on the “Custom Object” button in the top left and select “Upload Custom Object Records” from the dropdown menu.
A new window will open with a step Wizard. Let’s take a look at each step in detail.
Step 1: Data Source

Upload Details
Name: Give the upload a name. As a best practice, if your company follows a naming convention policy, be sure to leverage this within the upload name as it can be helpful for diagnosing any issues.
Description: This step is optional, enter a description of for the upload you are performing.
Specify New Settings
Source of Custom Object Record data: Choose the source of the upload. For this example, an Excel spreadsheet. You also have the ability to do a one time upload or set up scheduled uploads based on other data sources. New sources are created in the integration area.
Click on the Next button in the bottom right.
Step 2: Upload Data Source
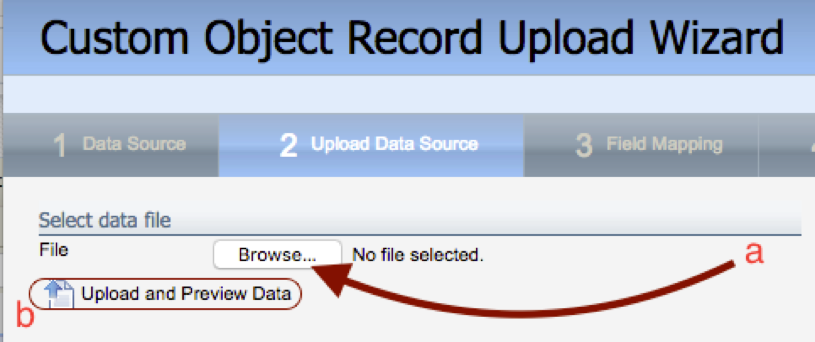
Select Data File
Click the “Browse button” and find the file you wish to upload. Once selected, click Upload and Preview Data, then click the Next button in the bottom right corner.
Step 3: Field Mapping
This is where you will decide where the data from the list, your source, will write to within the CDO, your target.
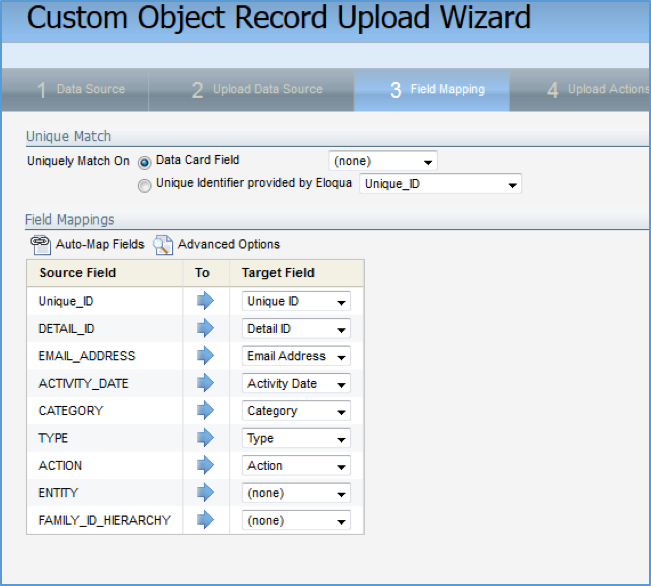
Unique Match
Uniquely Match On: This selection is used to specify how Eloqua knows if there is a field on the CDO record to be used to match on to append data to. If this field is set to none, there will be no match and a new record will be created for every row in your list.
Data Card Field = none (Select this if you have selected “none” in the “Unique Code Field” when you created your CDO)
Unique Identifier provided by Eloqua = If you selected a “Unique code field” when you created your CDO, select that field here.
Field Mappings
Click on “Auto-Map Fields” to automatically map most or all of your CDO fields. You may need to manually map some of fields.
Note: A field will automap if the upload file column name exactly matches your CDO field name.
Click the Next button.
Step 4: Upload Actions
This is where the following configurations options are set:
- Specify the Entity Type to which you are mapping the CDO records (Contacts or Companies)
- Set Read Only permissions if applicable
- Create the linkage between the Entity and CDRs
- Add CDRs to program builder if needed
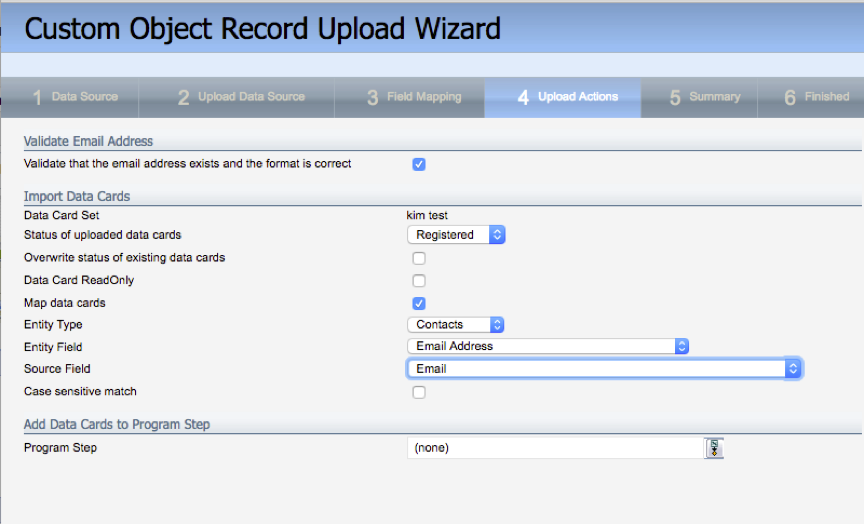
Validate Email Address
This setting forces the upload to validate that the email address exists in the upload and the format is correct. This is checked by default, uncheck if not required.
Import Data Cards
Status of uploaded data cards: This field determines what the status of the record should be set to upon import. Options include Registered, In Progress, On Hold.
Map data cards: This needs to be checked if you want the CDR’s linked to the Contact or Account record allowing you to personalize your campaigns or create segments based on a linked custom object record. If you want to create this linkage upon upload, you will need to configure the Entity Type to link to (Contacts or Companies (Accounts)), the field on the Entity on which to link, and the field on the Source on which to link. If the “Entity field data” and the “Source field data” do not match the CDR will not link to the record.
Add Data Cards to Program Step: If you would like to send the contacts from the upload to a Program Builder step, select the program and step here.
Click Next.
Step 5: Summary
This is a summary of your upload configuration and provides you the option to verify all of your settings.
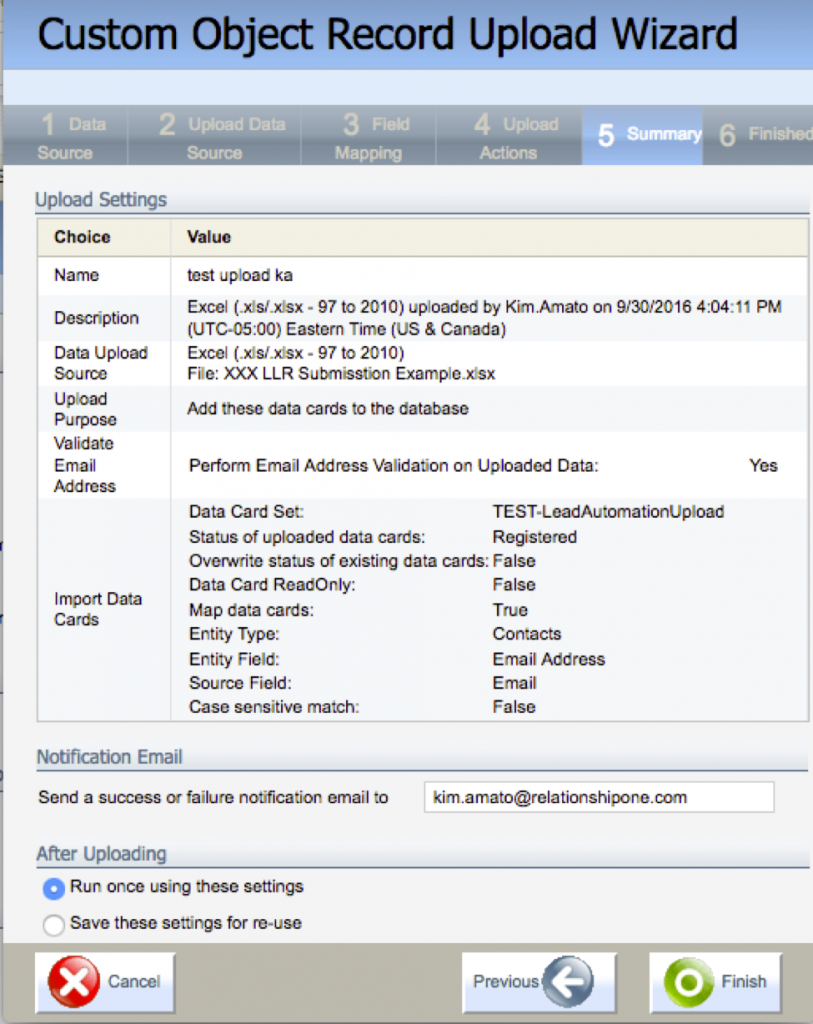
Notification Email
Enter an email address where you would like the success or failure notification email sent.
After Uploading
Run once using these settings: select the option that meets your objective. If this is a one-time upload, select Run these settings once. Or, if this is upload information you will use again, select to save an reuse them. You are able to select saved settings under the “Use Saved Settings” section in Step 1 of the Upload Wizard on your next upload. This will ensure consistent uploads to this CDO in the future. Note, Saved settings cannot be shared between different custom objects.
Click Finish.
Step 6: Finished
Pretty self-explanatory on this one.

Uploading data to a Custom Data Object using the Upload Wizard is one way of adding data to your Custom Object. Watch for our future Tool Tips related to the other options and best practices related to Custom Objects.
Ready to set up Custom Object Record Upload in your Eloqua instance but need a little extra support? Let us know! Or maybe you’re already using Upload Wizard and you want to roll it out to a larger group? Tell us about your experience in the comments below or fill out this form and someone will get back to you.